Langchain-Chatchat安装部署教程
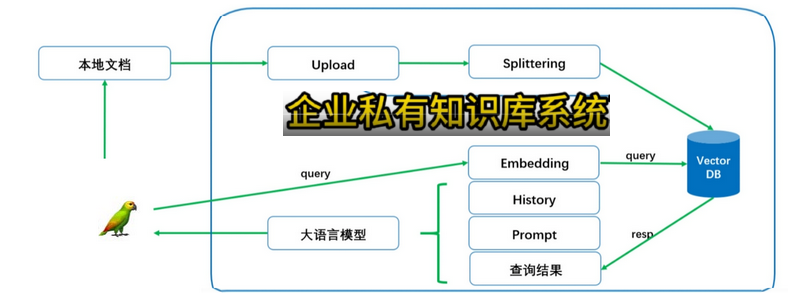
1 Langchain-Chatchat 档处理实现流程

该项目是一个可以实现 __完全本地化__推理的知识库增强方案, 重点解决数据安全保护,私域化部署的企业痛点。
稍微改造下:
2 安装
2.1 1 环境准备
环境:
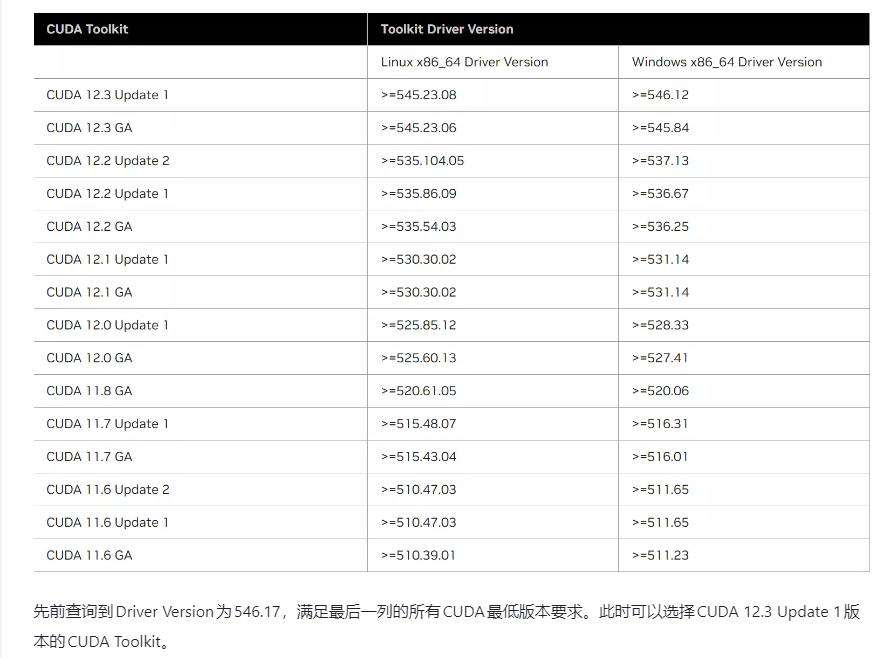
显卡驱动546.65 【这个显卡自带的cuda是12.3】 ,然后手动的安装了cuda12.1 。
Python 3.11.7 torch 2.2.0+cu121 torchaudio 2.2.0+cu121 torchvision 0.17.0+cu121
安装Langchain-Chatchat 0.2.10, 0.2.10将会是0.2.x系列的最后一个版本。
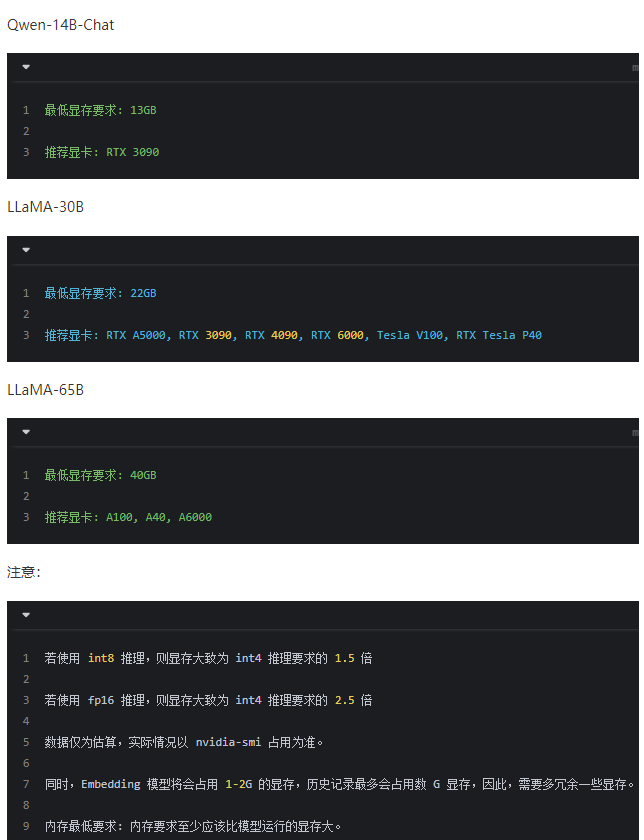
模型对显卡的要求:
阿里巴巴的千问 Qwen 14b-chat 最低显卡内存要求13G
LLaMa-30B 最低显卡内存22G
LLaMa-65B 最低显卡内存40G
chatglm3-6b 最低显卡内存7G(INT4量化级),加载半精度的ChatGLM3-6B 模型需要大概13GB 内存。
| 量化等级 | 生成 8192 长度的最小显存 |
|---|---|
| FP16 | 15.9 GB |
| INT8 | 11.1 GB |
| INT4 | 8.5 GB |
conda create -n Langchain-Chatchat  python=3.11.7
conda activate Langchain-Chatchat
pushd  D:\Software\AI\Langchain-Chatchat

# 拉取仓库
$ git clone https://github.com/chatchat-space/Langchain-Chatchat.git

# 进入目录
$ cd Langchain-Chatchat

# 安装全部依赖
$ pip install -r requirements.txt
$ pip install -r requirements_api.txt
$ pip install -r requirements_webui.txt
# 默认依赖包括基本运行环境(FAISS向量库)。如果要使用 milvus/pg_vector 等向量库,请将 requirements.txt 中相应依赖取消注释再安装。
请注意,LangChain-Chatchat 0.2.x 系列是针对 Langchain 0.0.x 系列版本的,如果你使用的是 Langchain 0.1.x 系列版本,需要降级您的Langchain版本。
2.2 2 模型下载
如需在本地或离线环境下运行本项目,需要首先将项目所需的模型下载至本地,通常开源 LLM 与 Embedding 模型可以从 HuggingFace 下载。
以本项目中默认使用的 LLM 模型 THUDM/ChatGLM3-6B 与 Embedding 模型 BAAI/bge-large-zh 为例:
下载模型需要先安装 Git LFS ,[Git Large File Storage(LFS)是一个开源的Git扩展工具,它可以优化Git对大型二进制文件的处理,例如音频、视频、数据集等。Git LFS将大文件存储在专门的服务器上,而不是直接存储在Git仓库中,这可以有效地减小Git仓库的大小,同时也帮助我们更好地管理和处理大型文件。]
然后运行
$ git lfs install
$ git clone https://huggingface.co/THUDM/chatglm3-6b
$ git clone https://huggingface.co/BAAI/bge-large-zh
2.3 3. 初始化知识库和配置文件
按照下列方式初始化自己的知识库和简单的复制配置文件
$ python copy_config_example.py
$ python init_database.py --recreate-vs
embed_model 有moka-ai/m3e-large bge-large-zh-v1.5 这2个是干什么的
moka-ai/m3e-large 这是一个名为m3e的大型中文语义理解模型,由Moka技术公司开发。它可以对中文文本进行表示并提取语义信息,从而帮助下游任务的理解。
bge-large-zh-v1.5 这应该是一个基于BERP(升级版BERT)的大型中文语言模型,目的是生成更加流畅和逼真的中文文本。
将这两个模块嵌入到系统中,可以使系统同时拥有语义理解和语言生成的能力。m3e理解输入语义,bge生成响应文本。
总结一下,moka-ai/m3e-large用于输入理解,bge-large-zh-v1.5用于响应生成。它们的组合可以提高系统的中英文处理与交互能力。
2.4 4. 一键启动
按照以下命令启动项目
$ python startup.py -a3 问题
conda init
报错:fatal: unable to access ‘https://github.com/chatchat-space/Langchain-Chatchat.git/': error setting certificate verify locations: CAfile: D:/Software/AI/ComfyUI_windows_portable/Git/usr/ssl/certs/ca-bundle.crt CApath: none
D:\Software\AI\ComfyUI_qiuye.ext\Library\bin git config –global http.sslCAInfo “D:/Software/AI/ComfyUI_qiuye/.ext/Library/usr/ssl/certs/ca-bundle.crt”
报错:
git clone https://huggingface.co/THUDM/chatglm3-6b Cloning into ‘chatglm3-6b’… fatal: unable to access ‘https://huggingface.co/THUDM/chatglm3-6b/': Failed to connect to huggingface.co port 443 after 21104 ms: Couldn’t connect to server (Langchain-Chatchat) D:\Software\AI\Langchain-Chatchat>git config –global http.proxy 127.0.0.1:10819
(Langchain-Chatchat) D:\Software\AI\Langchain-Chatchat>git clone https://huggingface.co/THUDM/chatglm3-6b
按照 pip install -r requirements.txt 安装了。python init_database.py –recreate-vs 初始化数据库报错
python init_database.py –recreate-vs
3.1 初始化数据库报错1。
PS E:\PyCharm2019\Langchain-Chatchat> python init_database.py --recreate-vs
recreating all vector stores
2023-12-05 23:49:57,505 - faiss_cache.py[line:80] - INFO: loading vector store in 'samples/vector_store/bge-large-zh' from disk.
2023-12-05 23:49:58,128 - SentenceTransformer.py[line:66] - INFO: Load pretrained SentenceTransformer: BAAI/bge-large-zh
2023-12-05 23:50:01,397 - embeddings_api.py[line:39] - ERROR: (MaxRetryError("HTTPSConnectionPool(host='huggingface.co', port=443): Max retries exceeded with url: /api/models/BAAI/bge-large-zh (Caused by SSLError(SSLEOFError(8, 'EOF
occurred in violation of protocol (_ssl.c:1002)')))"), '(Request ID: 768f0d91-383d-4f69-bfb6-1e49fa0801d7)')
AttributeError: 'NoneType' object has no attribute 'conjugate'

The above exception was the direct cause of the following exception:

Traceback (most recent call last):
File "E:\PyCharm2019\Langchain-Chatchat\init_database.py", line 108, in
folder2db(kb_names=args.kb_name, mode="recreate_vs", embed_model=args.embed_model)
File "E:\PyCharm2019\Langchain-Chatchat\server\knowledge_base\migrate.py", line 121, in folder2db
kb.create_kb()
File "E:\PyCharm2019\Langchain-Chatchat\server\knowledge_base\kb_service\base.py", line 81, in create_kb
self.do_create_kb()
File "E:\PyCharm2019\Langchain-Chatchat\server\knowledge_base\kb_service\faiss_kb_service.py", line 47, in do_create_kb
self.load_vector_store()
File "E:\PyCharm2019\Langchain-Chatchat\server\knowledge_base\kb_service\faiss_kb_service.py", line 28, in load_vector_store
return kb_faiss_pool.load_vector_store(kb_name=self.kb_name,
^^^^^^^^^^^^^^^^^^^^^^^^^^^^^^^^^^^^^^^^^^^^^^^^^^^^^
File "E:\PyCharm2019\Langchain-Chatchat\server\knowledge_base\kb_cache\faiss_cache.py", line 90, in load_vector_store
vector_store = self.new_vector_store(embed_model=embed_model, embed_device=embed_device)
^^^^^^^^^^^^^^^^^^^^^^^^^^^^^^^^^^^^^^^^^^^^^^^^^^^^^^^^^^^^^^^^^^^^^^^^^
File "E:\PyCharm2019\Langchain-Chatchat\server\knowledge_base\kb_cache\faiss_cache.py", line 48, in new_vector_store
^^^^^^^^^^^^^^^^^^^^^^^^^^^^^^^^^^^^^^^^^^^^^^^^^^^^^^^^^^^^^^^
File "C:\Python311\Lib\site-packages\langchain\vectorstores\faiss.py", line 911, in from_texts
embeddings = embedding.embed_documents(texts)
^^^^^^^^^^^^^^^^^^^^^^^^^^^^^^^^
File "E:\PyCharm2019\Langchain-Chatchat\server\knowledge_base\kb_service\base.py", line 399, in embed_documents
return normalize(embeddings).tolist()
^^^^^^^^^^^^^^^^^^^^^
File "E:\PyCharm2019\Langchain-Chatchat\server\knowledge_base\kb_service\base.py", line 38, in normalize
norm = np.linalg.norm(embeddings, axis=1)
^^^^^^^^^^^^^^^^^^^^^^^^^^^^^^^^^^
File "<array_function internals>", line 200, in norm
File "C:\Python311\Lib\site-packages\numpy\linalg\linalg.py", line 2541, in norm
s = (x.conj() * x).real
^^^^^^^^
TypeError: loop of ufunc does not support argument 0 of type NoneType which has no callable conjugate method
执行了pip install sentence-transformers并且去huggingface手动下载bge-large-zh模型,把model_config.py里面的EMBEDDING_MODEL和MODEL_PATH相关的路径改成自己放模型的地方, 更新代码后。
注意模型路径和使用双反斜杠(
\\)。删除
info.db,然后重新创建知识库。还是不行。
3.2 python startup.py -a 报错
报错 感觉是 torch不对。 torch==2.1.2 torchvision==0.16.2 torchaudio==2.1.2 xformers==0.0.23.post1
 Process model_worker - chatglm3-6b:
2024-02-04 11:24:09 | ERROR | stderr | Traceback (most recent call last):
2024-02-04 11:24:09 | ERROR | stderr |   File "D:\Software\miniconda3\envs\Langchain-Chatchat\Lib\multiprocessing\process.py", line 314, in _bootstrap
2024-02-04 11:24:09 | ERROR | stderr |     self.run()
2024-02-04 11:24:09 | ERROR | stderr |   File "D:\Software\miniconda3\envs\Langchain-Chatchat\Lib\multiprocessing\process.py", line 108, in run
2024-02-04 11:24:09 | ERROR | stderr |     self._target(*self._args, **self._kwargs)
2024-02-04 11:24:09 | ERROR | stderr |   File "D:\Software\AI\Langchain-Chatchat\startup.py", line 389, in run_model_worker
2024-02-04 11:24:09 | ERROR | stderr |     app = create_model_worker_app(log_level=log_level, **kwargs)
2024-02-04 11:24:09 | ERROR | stderr |           ^^^^^^^^^^^^^^^^^^^^^^^^^^^^^^^^^^^^^^^^^^^^^^^^^^^^^^
2024-02-04 11:24:09 | ERROR | stderr |   File "D:\Software\AI\Langchain-Chatchat\startup.py", line 217, in create_model_worker_app
2024-02-04 11:24:09 | ERROR | stderr |     worker = ModelWorker(
2024-02-04 11:24:09 | ERROR | stderr |              ^^^^^^^^^^^^
2024-02-04 11:24:09 | ERROR | stderr |   File "D:\Software\miniconda3\envs\Langchain-Chatchat\Lib\site-packages\fastchat\serve\model_worker.py", line 77, in __init__
2024-02-04 11:24:09 | ERROR | stderr |     self.model, self.tokenizer = load_model(
2024-02-04 11:24:09 | ERROR | stderr |                                  ^^^^^^^^^^^
2024-02-04 11:24:09 | ERROR | stderr |   File "D:\Software\miniconda3\envs\Langchain-Chatchat\Lib\site-packages\fastchat\model\model_adapter.py", line 362, in load_model
2024-02-04 11:24:09 | ERROR | stderr |     model.to(device)
2024-02-04 11:24:09 | ERROR | stderr |   File "D:\Software\miniconda3\envs\Langchain-Chatchat\Lib\site-packages\transformers\modeling_utils.py", line 2460, in to
2024-02-04 11:24:09 | ERROR | stderr |     return super().to(*args, **kwargs)
2024-02-04 11:24:09 | ERROR | stderr |            ^^^^^^^^^^^^^^^^^^^^^^^^^^^
2024-02-04 11:24:09 | ERROR | stderr |   File "D:\Software\miniconda3\envs\Langchain-Chatchat\Lib\site-packages\torch\nn\modules\module.py", line 1160, in to
2024-02-04 11:24:09 | ERROR | stderr |     return self._apply(convert)
2024-02-04 11:24:09 | ERROR | stderr |            ^^^^^^^^^^^^^^^^^^^^
2024-02-04 11:24:09 | ERROR | stderr |   File "D:\Software\miniconda3\envs\Langchain-Chatchat\Lib\site-packages\torch\nn\modules\module.py", line 810, in _apply
2024-02-04 11:24:09 | ERROR | stderr |     module._apply(fn)
2024-02-04 11:24:09 | ERROR | stderr |   File "D:\Software\miniconda3\envs\Langchain-Chatchat\Lib\site-packages\torch\nn\modules\module.py", line 810, in _apply
2024-02-04 11:24:09 | ERROR | stderr |     module._apply(fn)
2024-02-04 11:24:09 | ERROR | stderr |   File "D:\Software\miniconda3\envs\Langchain-Chatchat\Lib\site-packages\torch\nn\modules\module.py", line 810, in _apply
2024-02-04 11:24:09 | ERROR | stderr |     module._apply(fn)
2024-02-04 11:24:09 | ERROR | stderr |   File "D:\Software\miniconda3\envs\Langchain-Chatchat\Lib\site-packages\torch\nn\modules\module.py", line 833, in _apply
2024-02-04 11:24:09 | ERROR | stderr |     param_applied = fn(param)
2024-02-04 11:24:09 | ERROR | stderr |                     ^^^^^^^^^
2024-02-04 11:24:09 | ERROR | stderr |   File "D:\Software\miniconda3\envs\Langchain-Chatchat\Lib\site-packages\torch\nn\modules\module.py", line 1158, in convert
2024-02-04 11:24:09 | ERROR | stderr |     return t.to(device, dtype if t.is_floating_point() or t.is_complex() else None, non_blocking)
2024-02-04 11:24:09 | ERROR | stderr |            ^^^^^^^^^^^^^^^^^^^^^^^^^^^^^^^^^^^^^^^^^^^^^^^^^^^^^^^^^^^^^^^^^^^^^^^^^^^^^^^^^^^^^^
2024-02-04 11:24:09 | ERROR | stderr |   File "D:\Software\miniconda3\envs\Langchain-Chatchat\Lib\site-packages\torch\cuda\__init__.py", line 289, in _lazy_init
2024-02-04 11:24:09 | ERROR | stderr |     raise AssertionError("Torch not compiled with CUDA enabled")
2024-02-04 11:24:09 | ERROR | stderr | AssertionError: Torch not compiled with CUDA enabled
3.3
File "D:\Software\miniconda3\envs\Langchain-Chatchat\Lib\site-packages\torch\cuda\__init__.py", line 289, in _lazy_init

2024-02-04 17:30:38 | ERROR | stderr | raise AssertionError("Torch not compiled with CUDA enabled")

2024-02-04 17:30:38 | ERROR | stderr | AssertionError: Torch not compiled with CUDA enabled

pip list |findstr torch

torch 2.1.2

torchaudio 2.1.2

torchvision 0.16.2

(Langchain-Chatchat) D:\Software\AI\Langchain-Chatchat>nvidia-smi

Sun Feb 4 17:38:34 2024

+---------------------------------------------------------------------------------------+

| NVIDIA-SMI 531.41 Driver Version: 531.41 CUDA Version: 12.1 |

|-----------------------------------------+----------------------+----------------------+
卸载 torch pip uninstall torch torchaudio torchvision
pip uninstall torchaudio torchvision xformers torch
重要 pip install torch torchvision torchaudio –extra-index-url https://download.pytorch.org/whl/cu121 这将自动安装与当前CUDA 12.1匹配的最新 stable 版本。 匹配了。torch 2.2.0+cu121
代码的requirements.txt 可能没有gpu版本。
(Langchain-Chatchat) D:\Software\AI\Langchain-Chatchat>pip list |findstr torch torch 2.2.0+cu121 torchaudio 2.2.0+cu121 torchvision 0.17.0+cu121
可以看到后面带cu121 支持gpu 如果没有 就是cpu
也可以确认
看下我们的 pytorch 是否支持使用 GPU

import torch
torch.__version__
print(torch.cuda.is_available())

查看 cuda 版本: nvcc –V

查看 cuDNN版本:
import torch
torch.backends.cudnn.version()
重要 python startup.py -a 报错 ModuleNotFoundError: No module named ‘scipy’
(Langchain-Chatchat) D:\Software\AI\Langchain-Chatchat>pip install scipy

Requirement already satisfied: scipy in c:\users\administrator\appdata\roaming\python\python311\site-packages (1.11.4)

Requirement already satisfied: numpy<1.28.0,>=1.21.6 in d:\software\miniconda3\envs\langchain-chatchat\lib\site-packages (from scipy) (1.24.4)

(Langchain-Chatchat) D:\Software\AI\Langchain-Chatchat>python

Python 3.11.7 | packaged by conda-forge | (main, Dec 23 2023, 14:27:59) [MSC v.1937 64 bit (AMD64)] on win32

Type "help", "copyright", "credits" or "license" for more information.

>>> from scipy.sparse import issparse

Traceback (most recent call last):

File "<stdin>", line 1, in <module>

ModuleNotFoundError: No module named 'scipy'

根据错误信息,scipy包明明已经安装在Python的site-packages中,但是导入时还是提示没有该模块。

这种情况常见的原因是Python正在找错环境中的模块。

我的推测是您使用的是conda管理的Python环境,但是pip install scipy默认安装是在全局基础环境中,而不是conda env。

为了解决这个问题,有以下两种方法:

在当前conda env内使用conda安装scipy:

conda install scipy
python startup.py -a ok 了
python init_database.py –recreate-vs 也ok 了

4 总结:
requirements.txt 有问题,文件安装后要 pip uninstall torch torchaudio torchvision。
然后重新安装pip install torch torchvision torchaudio –extra-index-url https://download.pytorch.org/whl/cu121 。
cuda的版本与torch的版本一定要对应:
发现现在显卡驱动自带cuda是cuda12.3 ,这样可能支持2.1.2 torch 。cuda12.1是 531.41显卡驱动 下载显卡驱动 重新安装 531.41显卡驱动。
cuda12.1支持torch 2.1.2后面的,按上面是自动安装 torch 2.2.0的
cuda与显卡驱动的关系。
比如你要cuda12.1的 ,显卡驱动需要 大于等于531的版本
torch版本与cuda的关系:
根据cuda安装你对应的torch。比如我的是cuda12.1 用pip install torch torchvision torchaudio –extra-index-url https://download.pytorch.org/whl/cu121 自动安装。其它cuda版本按如下方式安装
Linux and Windows
# ROCM 5.6 (Linux only)
pip install torch==2.1.2 torchvision==0.16.2 torchaudio==2.1.2 --index-url https://download.pytorch.org/whl/rocm5.6
# CUDA 11.8
pip install torch==2.1.2 torchvision==0.16.2 torchaudio==2.1.2 --index-url https://download.pytorch.org/whl/cu118
# CUDA 12.1
pip install torch==2.1.2 torchvision==0.16.2 torchaudio==2.1.2 --index-url https://download.pytorch.org/whl/cu121
# CPU only
pip install torch==2.1.2 torchvision==0.16.2 torchaudio==2.1.2 --index-url https://download.pytorch.org/whl/cpu
v2.1.1
确认cuda torch是否安装成功:
看下我们的 pytorch 是否支持使用 GPU

import torch
torch.__version__
print(torch.cuda.is_available())

查看 cuda 版本: nvcc –V

查看 cuDNN版本:
import torch
torch.backends.cudnn.version()